Opening & "Z"ing Registers
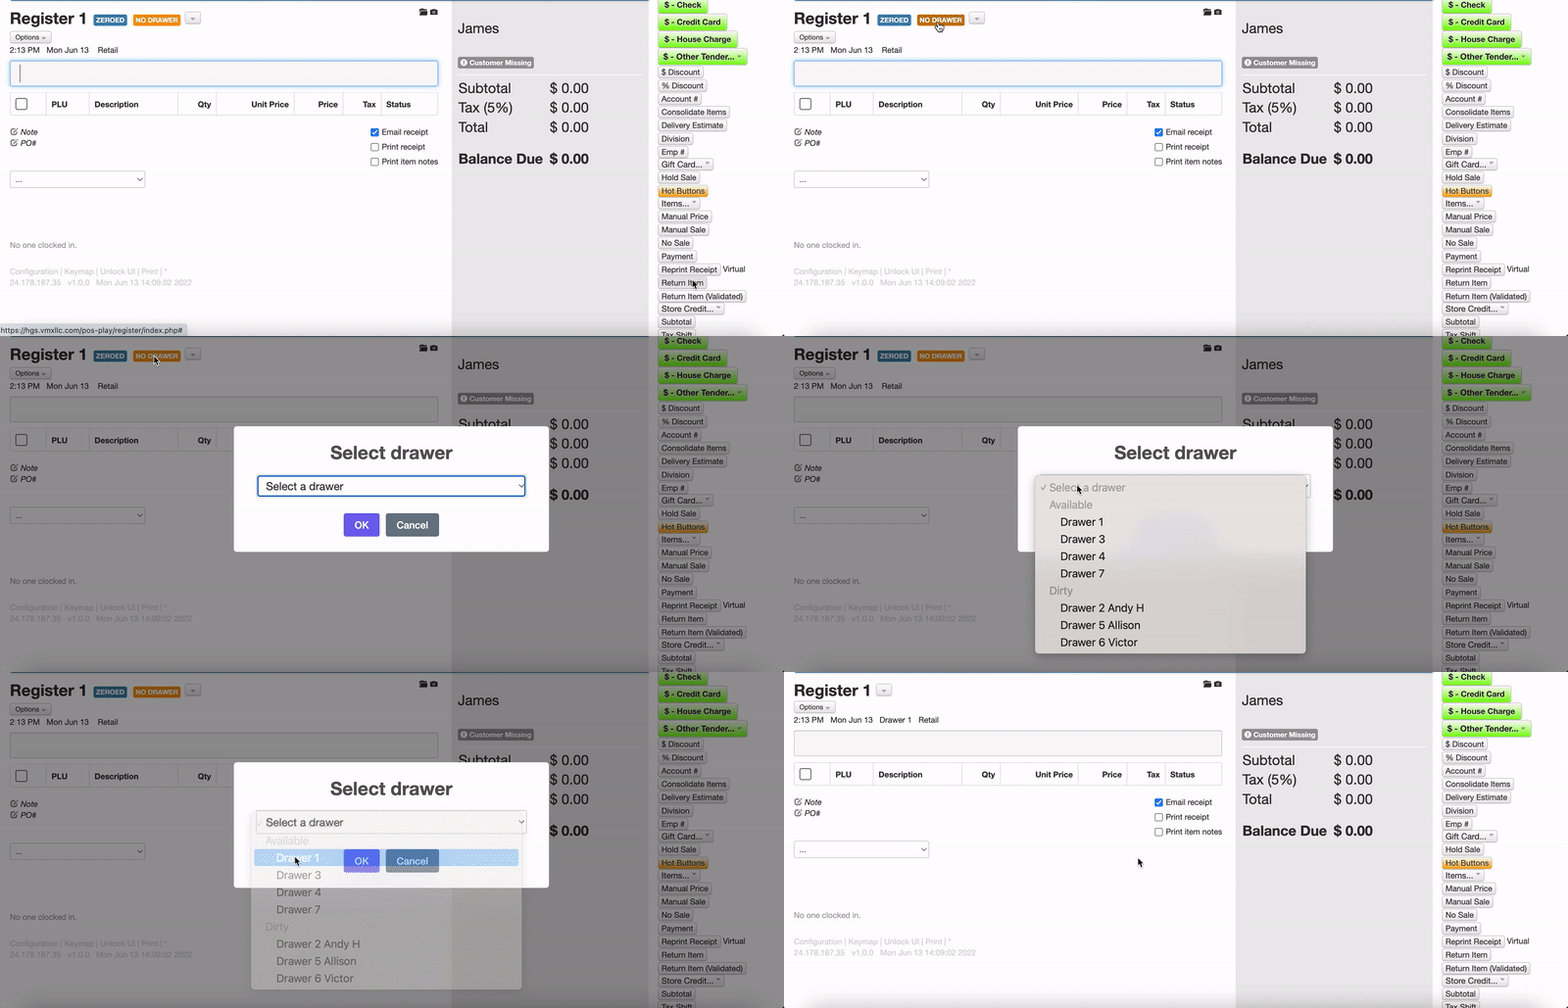
Before you can start making sales, you have to enter a drawer for the register you are using.
Add a Drawer
- At the top of the register page, there's an orange "NO DRAWER" icon.
- Click the icon and select the drawer you'll be operating out of for the day.
- You may or may not use the same physical drawer every day, but you should still set and "Z" the drawer every day.
- Once you've indicated the correct drawer in the popup, you're good to go for the day!
"X"ing & "Z"ing (X/Z button)
The X/Z button gives you two distinct actions: X prints the current totals without changing anything, and Z prints the totals and closes out the drawer.
What X does
- Prints the same tape Z would print — sales, credit cards, cash, checks, by tender — so you can examine totals without committing to anything.
- The register stays open for sales. Nothing is cleared.
- Common uses:
- Mid-shift spot check at a shift change: print an X tape and (if you want) count the drawer to make sure things line up.
- End-of-night sanity check right before Z'ing — for example, do the checks in the drawer match what the system says?
- Anywhere you want a "what would Z look like right now?" preview.
What Z does
- Prints the same totals as X, and:
- Clears the totals from the register
- Removes the drawer from the register (logically — the system marks it as no longer in use here, so you're free to physically pull it as well)
- Opens the cash drawer (one last time)
- Auto-emails a copy of the Z tape to whoever's configured to receive Z tapes for your store
- No further cash or check sales can happen on this register until a new drawer is added. Other tenders that don't touch the cash drawer — credit cards, gift cards, store credit, house charges, and rewards — still work, so you can keep ringing card sales after Z'ing if you want.
How to do it
- Press the X/Z button on the register.
- A popup appears with three options:
- Cancel — dismiss the popup, do nothing.
- X (green) — print the totals tape and stay open. Use this for a spot check.
- Z — print the totals tape, close the drawer, and lock the register.
- Pick whichever you want.
You can do as many X's as you like during the day. You typically only Z once, at the end.
After "Z"ing — counting and cleaning the drawer
Once the drawer is Z'd, the cash needs to be counted and the drawer "cleaned" (set up for the next day).
- If your company is configured for count-after-Z, the register automatically takes you to the drawer's count page so you can enter denominations right at the register. Counting at the register is good when you want a single trusted person to count where they're standing, with the system walking them through bills/coins and computing the deposit amount on the fly.
- If your company is not configured for count-after-Z (the default), the register locks itself after Z and you'll head to Reports > Drawers later — at the office, the next morning, or whenever your workflow says — to count and reconcile that drawer.
Either way, the next step after counting is to clean the drawer, which sets it up to be used again.
Tip for managers: the count-after-Z configuration is a per-company toggle. Whichever side you pick, the drawer-counting workflow itself is the same — only the timing and location change.