Order Page
The top of the Order Page shows the order's PO # followed by the vendor name and the vendor code in parentheses. Below that are the main action buttons: + Item and the Receive drop-down (shown while the order is still pending), the With Checked drop-down, and Import... (bring in a vendor file -- see Importing POs), along with a print icon and a View PO by # search box for jumping to another PO.

The vendor name is shown in blue, indicating that it is a link. This link will take you to the vendor page where you can view the vendor information. Learn more about vendor pages here:
Adding Items
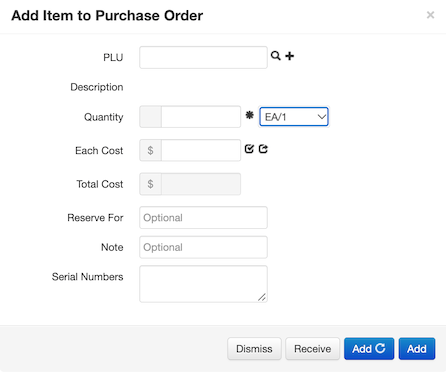
The + Item button is used to add items to the PO. When you select this button, an Add Item to Purchase Order popup will appear that allows you to enter the item information. The fields in the popup include:
| PLU | Search all non-archived items or directly type in the item number |
|---|---|
| Description | Shows the description of the item entered in the PLU field |
| Quantity/UOM | Enter the quantity of the item being added -- Change the unit of measure for the item |
| Each Cost | Enter the cost per item being added |
| Total Cost | Quantity * Each Cost- click this field and enter the total cost of all the items, and Each Cost will be recalculated accordingly |
| Reserve For | Enter a customer account here to reserve items on the PO for them |
| Note | Add a note to the line item |
Info
Small icons in the popup provide shortcuts:
- The magnifying-glass icon next to the PLU field opens the inventory search page in a new tab, and the plus icon starts a new inventory item.
- The asterisk icon next to Quantity will multiply the quantity you have entered in the field by the quantity you enter when prompted. (For example, if you are adding flats of 12, use this function to calculate the total number of items being ordered.)
- The check icon next to Each Cost ("Use current average cost") will insert the item's current average cost as the each cost.
- The arrow icon next to Each Cost ("Use last each cost") will use the item's most recent cost as the each cost.
Order multiple quantity list in the Add Item popup
When the item you pick in the Add Item to Purchase Order popup is bought in packs, clicking a quantity box drops down a list of the first five multiples of the pack size -- for a pack of 64: 64, 128, 192, 256, 320. Click a number to fill in the quantity.
- The pack size comes from the OM (Order Multiple) column in the Part Numbers table on the item page's Ordering tab, for this PO's vendor. If that vendor has no part number row for the item, or its OM is blank or 1, the item's own Order Multiple is used.
- If your company enters quantities per store, the popup shows a Qty box for each store (plus Total Quantity), and the list drops down on every store's box.
- The list is only a guide. You can still type any quantity, including one that isn't a multiple.
- No list appears when the item has no pack size set.
The same list appears when you add an item to a PO from the Order Planning report.
Popup Button Options:
Just make the popup disappear without making changes to the PO
Add the item and simultaneously receive it
Add multiple items without repopulating the popup
Add the item and return to the Order page
Order Totals & Info
View and edit an overview of order totals, dates, notes, and more!

Total Costs
| Total On Order: | Total cost of all items |
|---|---|
| Total Received: | Total cost of received items, excluding items on the PO but listed as "Ordered" |
| Other Costs: | Cost of shipping and other misc. vendor charges, enter this amount by clicking the field |
| Total Invoice: | Total Received + Other Costs |
Info
If a check-circle icon appears next to Other Costs, those costs have been rolled into the items' costs (freight roll-in).
Dates & Invoice Info
| Created: | Date the PO was created |
|---|---|
| Est. Delivery: | Estimated delivery date, entered by clicking the field and selecting from a calendar |
| Bill Date: | The accounting date used when the PO is closed (see QB Dates) |
| Invoice #: | Invoice number to match invoice to PO |
| Due Date: | Terms of payment for vendor- when the bill needs to be paid by |
Status & Additional Info
| Received: | Either "NO" for not received yet or the Received Date |
|---|---|
| Status: | While the order is still pending, set it to Building, Booking, Submitted, In Transit, Confirmed, or Arrived. Once the order is received or closed, the status is shown as "Received" or "Closed" and can no longer be changed here. |
| Attachments | Links to all the attachments (AV, confirmation, invoice, etc.) associated with the PO |
| Notes: | Enter notes on the PO by selecting the pencil icon next to Notes |
Tip
If you submit your order via the Submit ... button at the bottom of the order page, VMX will automatically set the order status to "Submitted"
Attaching the vendor invoice to a purchase order
You can attach the vendor's invoice (or a confirmation, credit memo, check stub, or order receipt) directly to the PO, so the paperwork travels with the order instead of living in a separate folder. Attaching an invoice is also what moves a received order onto the Closeable Orders list.
Open the purchase order, make sure your session is unlocked, then use whichever is easiest:
- Drag the file onto the page. Drag the invoice from your computer onto the open PO until the screen dims and shows "Drop...", then let go. You can drag several files at once.
- Your name > Attach file... Click your name in the top right of the page and choose Attach file..., then browse to the invoice.
- Your name > Attach from QR... Choose Attach from QR..., pick the attachment type, then scan the QR code with your phone to upload a photo or PDF from it. This is the quick way to get a paper invoice in without a scanner.
- More > Attachments. Click More at the top of the page, choose Attachments, then drag the file in or use the +Attachment button.
Whichever route you use, you land on the attachment page where you set the attachment type (choose Invoice) and add a note, then click Save. Attachments on the order are listed in the Attachments row of the order's Status & Additional Info panel.
See Adding a New Attachment for the same options on items, customers, and other pages.
Items Table

The standard columns on the order items table are below. (Some companies have extra columns, such as On Hand or Barcode, enabled by VMX.)
| Checkboxes | Checkboxes at the left of each row select items for the With Checked and Receive menus. The checkbox in the header row checks/unchecks all rows. |
|---|---|
| PLU | Item number & link to item page |
| Description | Full description and wishlist info, if applicable |
| Part # | Item's part number, editable on the Order Page or on the Item Page |
| Note | Add notes to specific line items |
| Qty | Quantity on order |
| UOM | Unit of measure |
| Each Cost | Cost per item, entered on the + Item popup, but editable by clicking the table cell |
| Subtotal | Each Cost * Quantity |
| Margin | (Each Price - Each Cost) / Each Price, as a percentage |
| w/ Freight | Margin adjusted to include shipping costs |
| Each Price | Retail price set for item |
| Department | Item's department |
| Status | Item's order status (Ordered, Received, Canceled, or Unreceived) and the employee who added the item |
Info
The item description column may also include an "Also on order" alert like this: \
which shows the quantity, PO #, and vendor information if an item is on order multiple times!
\
which shows the quantity, PO #, and vendor information if an item is on order multiple times!
Item Icons in the PLU Column
Small blue icons appear after the item number in the PLU column of the order items table. They tell you what the item already has on file, so you can spot gaps without opening each item page:
| Picture icon | The item has a photo. Hover over the icon to see the photo without leaving the order. On a touchscreen, tap the icon to hold the photo open, then tap anywhere else to close it. |
|---|---|
| Tag icon | The item has a sign on file. |
| Barcode icon | The item is serial numbered. |
An icon only appears when the item has that thing, so a line with no picture icon is an item with no photo. This is a quick way to find items that still need photos while you are reviewing an order.
The photo preview is for on-screen use only -- it never appears on a printed or emailed PO. Some companies have additional icons in this column enabled by VMX; contact help@vmxllc.com if you are unsure what an icon on your order means.
Line Item Menu
The last column of the order table (shown while the order is still pending) is a drop-down arrow with actions for that line item. The options depend on the item's status:
Receive (receive just this line), Edit (repopulate the item popup and make changes), Duplicate (add an identical line item), Cancel (mark the item "Canceled" -- it stays visible on the order but cannot be received), and Delete (remove the line from the order)
Unreceive (undo the receipt of this line) and Unreceive + Cancel (undo the receipt and cancel the line)
Uncancel (return the line to "Ordered" status) and Delete (remove the line from the order)
Changing the Each Price and the suggested retail price
To change an item's retail price from the PO, click the number in its Each Price cell. A box asks you to "Enter new retail each price". It shows the current price. Type the new price and select OK.
If the item's department (or its sub-department) has margin ranges set up, the box also shows a Suggested price, for example Suggested: $25.00 (60% margin, from the department's margin range). This is the price that reaches the bottom of the department's Green Margin Range at the line's Each Cost, rounded up to the next cent. The suggestion is only shown in the message; the input still has the current price, so nothing changes unless you type the suggested price yourself.
- A sub-department's margin ranges take priority over its department's, the same as for the Margin column colors.
- If the Green range has no lower number (or is a single number, like
80, and not a range, like80-), the suggestion uses the top of the highest Red or Yellow range. - No suggestion is shown when neither the department nor the sub-department has margin ranges set, or when the line has no Each Cost.
Margin ranges are set under Inventory → Departments. See Departments & Brands.
Order Table Totals
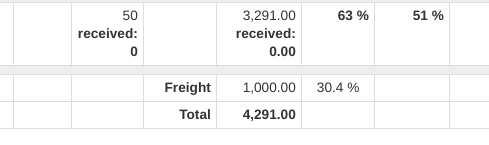
Beneath the items on the table, view the total quantity, total cost, margin, and margin with freight. If only some items have been received, the totals show both the ordered and received amounts. The total cost of the order including Other Costs is shown at the bottom of the table.
Receiving & Unreceiving Items
Use the Receive drop-down at the top of the order page to receive or unreceive the checked items:
- Check the line items you want to receive (or use the header checkbox to check all).
- Select Receive → Receive Checked.
- In the Receive Checked Items popup, choose whether to Add Tags (add the items to the list of tags to print) and Add Reservations (create reservations for any special orders).
- Select Receive Checked.
To unreceive items that were already received, check them and select Receive → Unreceive Checked. The Unreceive Checked popup lets you Remove Tags and Remove Reservations at the same time.
You can also receive or unreceive a single line from the drop-down menu at the end of its row.
Once every item is either received or canceled, buttons appear to move the whole order along: Complete marks a pending order as received; Make Pending moves a received order back to pending; Close Order closes the received order (and can send it to your accounting system); Reopen Order returns a closed order to the received list.
With Checked
Use the With Checked drop-down to run an action on the line items whose checkboxes are checked. Actions include:
- Add Tags: Add selected items to the tag queue
- Reorder: Add items to a new PO with the same vendor, which will be created when you select this option
- Load to Register: Auto-ring up selected items to the register page
- Move Items: Transfer "Ordered" items to a different PO
- Negate Quantities: Change the item quantities from positive to negative (or negative to positive)
- Apply/Remove Discount: Add a vendor discount on all the items and toggle the check button to include or exclude freight prices in the discount. You can also select a percentage based discount or an amount.
- Cancel / Un-Cancel: Cancel the selected ordered items, or return canceled items to "Ordered"
- Delete Items: Delete the selected (non-received) items from the PO
- Pumpkin: Distribute a total cost among the selected rows according to their retail price so that they all have the same margin
- Set Primary Vendor: Set the primary vendor for each selected item to the PO vendor
- Set Costs (by Margin): Set the cost for each selected item based on a margin you enter
Companies with multiple stores also see Set Store (set the receiving store for each ordered item), Create Transfers (create inter-store transfers for this order), and Split PO by Store (move items destined for other stores onto new, store-specific POs).
Pumpkin: Spread One Lump Sum Cost Across Items
Pumpkin (on the With Checked drop-down of the Order Page) takes one total cost that you type in and splits it across the checked line items in proportion to what each line is worth at retail. Every line it touches ends up at the same margin.
Use it when a vendor bills one lump sum for a mixed lot and never tells you what any single item cost. A load of pumpkins invoiced at one price but sold in five sizes, a pallet of mixed nursery stock, a grab-bag of giftware billed as "assorted" -- in all of these you know the total you paid and the retail price of each item, but not the per-unit cost. Pumpkin works backward from retail so the cheap items carry a small share of the bill and the expensive items carry a large one.
Pumpkin only changes the Each Cost of the lines you checked (and, with it, Subtotal, Margin, and the order totals). It never changes retail prices.
Use Pumpkin to cost a mixed lot
Before you start: the PO must still be pending, the lines you want to cost must still be in "Ordered" status (not received, not canceled), and each item needs a retail price on its item record -- that price is what the split is weighted by. The With Checked menu appears only for employees whose permissions include Order.
- Open the PO on the Order Page and make sure every item in the lot is on the order with its correct quantity.
- Check the box at the left of each line that the lump sum covers. Leave every other line unchecked -- freight lines, items billed separately, and anything already correctly costed.
- Select With Checked → Pumpkin.
- A box appears asking: "Distribute cost among selected items using retail price weighted allocation:" Type the total cost the vendor billed for those lines and select OK. You can enter it the way it is printed on the invoice --
1200,1200.00and$1,200.00are all read as twelve hundred dollars, and dollar signs, commas and spaces are ignored. If what you type isn't a number at all, you get the message Enter the total cost as a number, for example 1200.00. and nothing is changed. - The order table refreshes. Check the Each Cost column on each line and the Margin column -- every line you checked now shows the same margin.
The margins in step 5 match because the split is weighted by the retail price on each item record, and that is normally the same price the line shows in Each Price. Two kinds of line are exceptions: items priced separately per store, and Price Required items whose price was typed on this PO. On those lines Each Price is not the price Pumpkin weighted by, so their margins can land somewhere other than the lot's.
If the lot also came with a freight or handling charge that you do not want folded into the item costs, leave it out of the amount you type here and record it in Other Costs instead (see Total Costs).
Worked example: splitting one $600.00 invoice with Pumpkin
A vendor bills $600.00 for a mixed lot. You put all three items on the PO, and their retail prices are already set:
| Item | Qty | Each Price (retail) | Retail value of the line |
|---|---|---|---|
| Small size | 40 | $5.00 | $200.00 |
| Medium size | 30 | $10.00 | $300.00 |
| Large size | 20 | $25.00 | $500.00 |
| Total | $1,000.00 |
You check all three lines, select With Checked → Pumpkin, and enter 600.
The lot is worth $1,000.00 at retail and cost $600.00, so cost is 60% of retail across the board. Each line receives that same 60%:
| Item | Share of retail value | Cost allocated to the line | Each Cost | Margin |
|---|---|---|---|---|
| Small size | 20% | $120.00 | $3.00 | 40% |
| Medium size | 30% | $180.00 | $6.00 | 40% |
| Large size | 50% | $300.00 | $15.00 | 40% |
| Total | 100% | $600.00 | 40% |
The large item absorbs five times the cost of the small one because it is worth five times as much on the shelf. All three end at 40% margin, which is exactly what the whole lot returns.
The margin every line lands on is simply the margin of the lot as a whole: 1 − (total cost ÷ total retail value). If that number comes out lower than you want, the fix is a retail price change, not a cost change -- Pumpkin is only reporting what the lot is actually worth.
How the Pumpkin split is calculated
For the lines you checked, VMX:
- Multiplies each line's quantity by the retail price on that item's record to get the line's retail value, and adds those up to get the retail value of the whole selection. On a line ordered by the case or another unit of measure, the quantity used is the number of individual units, not the number of cases shown in Qty.
- Gives each line the share of your total cost that matches its share of that retail value.
- Divides each line's share by its quantity to get the new Each Cost, rounded to six decimal places.
Because every line gets the same cost-to-retail ratio, every line ends at the same margin. Rounding remainders are not thrown away: one row in the selection absorbs the leftover fractions of a cent, so the line costs still add back up to the amount you typed.
The weighting always uses the retail price on the item record. For items priced separately per store, and for Price Required items whose price was typed on this PO, that is not the price shown in the line's Each Price column -- so those lines will not finish at the same margin as the rest.
Quantity matters as much as price. Two lines at the same retail price take different shares of the bill if one has more units on the PO, because the split is by what the line is worth in total, not by what one unit sells for.
When not to use Pumpkin
- The invoice already lists a per-item cost. Type those costs into Each Cost on each line instead (or click Total Cost in the Add Item to Purchase Order popup and let VMX back out the each cost). Pumpkin's whole purpose is filling in costs you were never given.
- The retail prices aren't set or aren't right yet. The split is only as good as the prices it is weighted by. Fix retail on the item records first, then run Pumpkin.
- You want to hit a target margin rather than spend a known total. Use With Checked → Set Costs (by Margin), which sets each cost from a margin you type.
- You're spreading freight across an order that is already correctly costed. Record it in Other Costs instead.
- The lines are already received, or the PO is no longer pending. Pumpkin edits ordered lines on a pending PO only.
- Inter-store transfers. Pumpkin does not appear on the With Checked menu of a transfer.
Pumpkin error messages
Costs are saved only when every checked line passes, so if you get one of these messages, nothing on the order has changed -- fix the selection or the amount and run Pumpkin again.
- "Nothing to distribute cost to!" -- no line items were checked. Check the boxes at the left of the rows first, then select With Checked → Pumpkin.
- "Total retail value must not be 0." -- the checked lines have no retail value to weight by, usually because the items have no retail price on their item records, or because positive and negative quantities in the selection cancel out. Set retail prices on the items, or narrow the selection, and try again.
- "This PO Item is not 'Ordered' -- it's 'Received'." -- one of the checked lines has already been received (the message names whichever status it found, such as "Canceled"). Uncheck it, or unreceive it first, then run Pumpkin on the ordered lines.
- "PO# 1234 is not 'Pending'." -- the order has already been received or closed. Costs on it can no longer be edited this way.
-
"Order unit cost must be positive." -- the split worked out to a negative cost on at least one line. Either the amount you typed was negative (Pumpkin distributes a cost you paid, so it must be zero or more), or the checked lines add up to a negative retail value because the negative quantities in the selection outweigh the positive ones.
-
"Enter the total cost as a number, for example 1200.00." -- what you typed wasn't a number once the currency symbol and separators were taken out. Retype the amount; nothing on the order was changed.
- "The total cost cannot be negative." -- Pumpkin distributes a cost you paid, so the amount must be zero or more.
Toggle, Export, & Submit
Select the Toggle Prices button at the bottom of the order page to show or hide the cost columns (Each Cost, Subtotal, Margin, and w/ Freight) on the order table -- useful before printing a copy that shouldn't show costs.
Select the Export ... button to create an Excel spreadsheet or PDF of the PO. Use the popup to select the file format, which columns to include, a note to the vendor, the sort order, and whether or not you want to download the file.
Info
If you do not select Download, the system will just open the file in a new tab!
Select the Submit ... button to send a PO to the vendor (or to anyone) right from the order page! In the Submit to Vendor popup, choose the method (Email, or Phone to record that the order was submitted over the phone), the format (Excel or PDF), and which columns to include. If there is an email address recorded in the vendor profile, it is shown in the Recipient field and used automatically when you leave the field blank. Check CC Me to receive a copy of the email yourself.
Info
If you submit via email, the reply-to email will be the email address for the employee who submitted the order. If that employee doesn't have an email address in the system, the reply-to address will be the same as the sender.
Which cost goes on a new PO line
When items are added to a PO without typing a cost, the cost comes from the item's Ordering tab first:
- Vendor List Cost — if the item has a List Cost for the PO's vendor (Ordering tab > Part Numbers), that is used.
- Otherwise, the last received cost, and if the item has never been received, its average cost.
This applies when adding from Inventory Search (Add to PO), from Order Recommendations, and when you add an item on the PO page without entering a cost. From Order Recommendations, an item with no List Cost uses its Market Cost before average cost. At the register, Add to PO asks which cost to use and shows a preview (see Register).