Adding New Deliveries & the Delivery Ticket Page
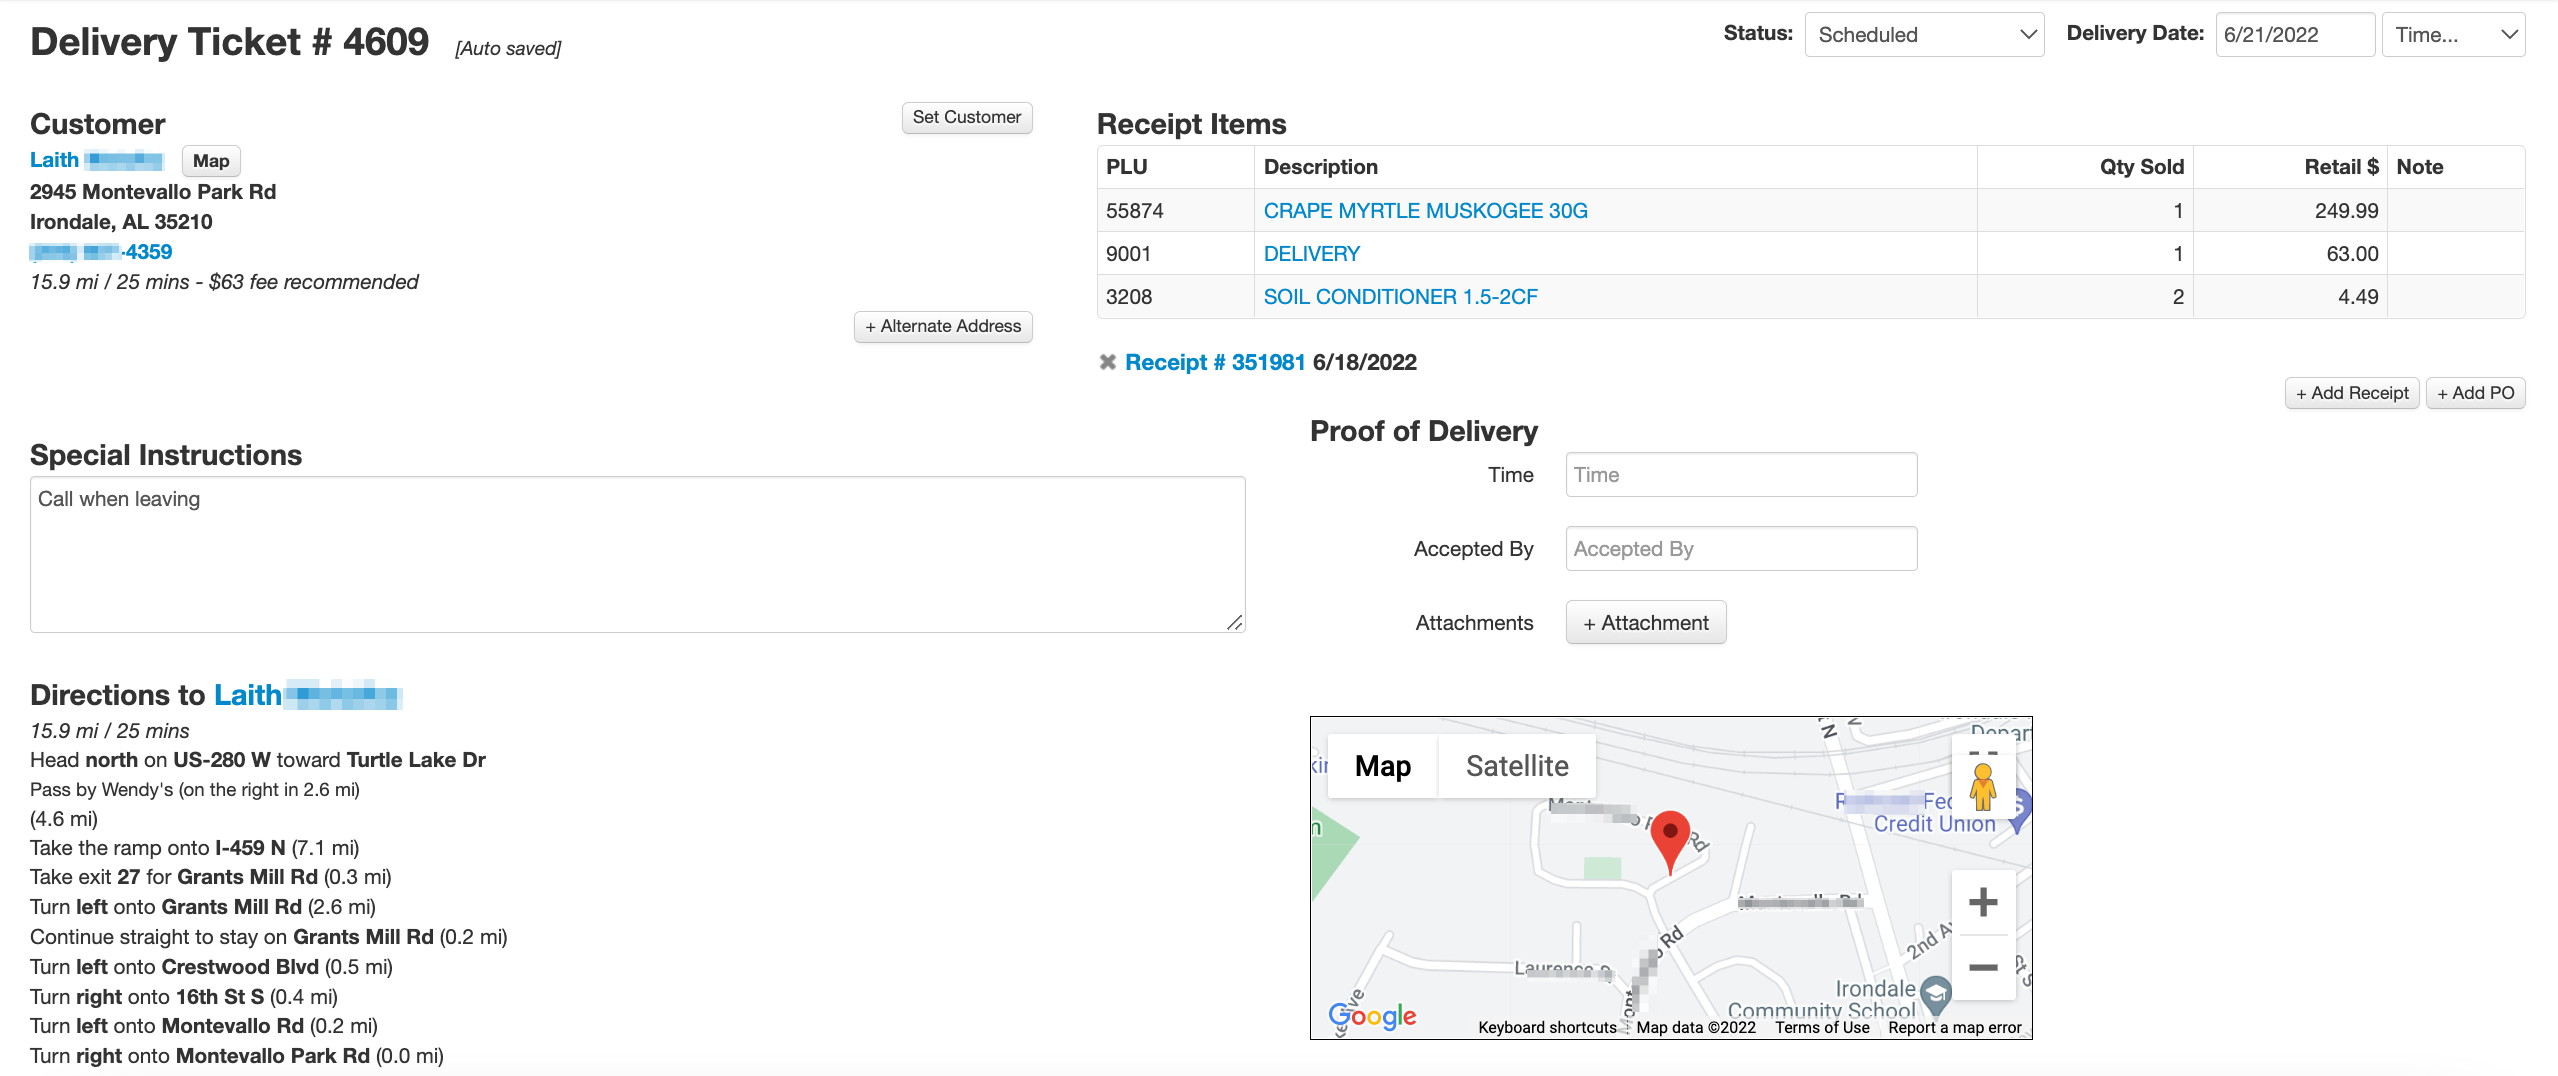
Every delivery in VMX is tracked on a delivery ticket — a single page that holds the customer, the delivery address, the items, the schedule (status, date, time), the driver and truck, special instructions, driving directions, and proof of delivery. This page covers creating tickets and working with each part of the ticket. For the list views that organize tickets by day, see the Deliveries overview; for statuses, dates, and blackout dates in depth, see Delivery Scheduling & Blackout Dates; for routes, vehicles, and driver printouts, see Delivery Routes & Driver Printouts.
Create a delivery ticket automatically from a sale
When a sale at the register includes your store's delivery fee item, VMX creates a delivery ticket for it automatically — no extra steps at the counter:
- Ring the sale as usual, including the delivery item, and complete the transaction.
- A new delivery ticket is created with the receipt already attached, the customer already set (from the receipt), and all the receipt's items listed on the ticket.
- Open the ticket from the Deliveries tab to schedule it — tickets created from a completed sale start with status On Hold until a delivery date is set. (Tickets created from Hold Sale with Create delivery checked usually start as Scheduled with no date yet. Open the ticket and pick the date.)
If that receipt is later voided at the register, the linked delivery ticket is automatically set to Canceled.
Which item(s) count as your delivery fee item is configured per-client by VMX — contact help@vmxllc.com if delivery tickets aren't being created from your delivery sales.
Create a delivery or pickup ticket from a held sale
When you hold a sale at the register, the Hold dialog has a Create delivery checkbox (labeled Create delivery/pickup for stores that track pickups). Tick it and VMX creates a delivery ticket with the held sale already attached, so the order shows on the Deliveries page before the customer has paid.
- Holding the same sale again later keeps its existing ticket; it does not make a second one.
- Some stores have the Create delivery/pickup checkbox ticked by default (configured per-client by VMX). For those stores, a ticket is only created when the held sale actually includes a delivery, pickup, or install item. Holding a sale with none of those items (for example, a potting charge or a class sign-up) creates no ticket, even with the box ticked. Add the delivery, pickup, or install item to the sale and hold it again to get a ticket.
Contact help@vmxllc.com if you'd like the checkbox ticked by default for your store.
Create a delivery ticket manually (+ Delivery)
To create a delivery ticket that isn't tied to a delivery fee sale (for example, a free delivery or a vendor drop-off):
- Go to the Deliveries tab.
- Click + Delivery at the top of the page. A new, blank ticket opens immediately.
- Click Set Customer to attach the customer (see "Set or change the customer" below).
- Click + Add Receipt to attach the sale so the items appear on the ticket (see "Attach receipts, held sales, and POs" below).
- Set the Date to put the delivery on the schedule.
Delivery tickets save automatically
Every change on a delivery ticket — status, date, customer, notes, driver, and so on — is saved the moment you make it. The [Auto saved] note next to the ticket title is the reminder: there is no Save button, and it's safe to navigate away at any time.
Set or change the customer on a delivery ticket
The customer usually comes from the attached receipt automatically. To set or change it by hand:
- Click the Set Customer button next to the Customer heading. (The button shows when no customer is set yet.)
- In the Ticket Customer dialog, type the customer's number or start typing their name in the Customer Number field — matching customers appear as you type.
- Pick the customer and click Set. The page reloads with the customer's name, address, phone numbers, and email on the ticket.
The customer block also includes:
- The customer's name, linked to their customer page.
- A Map button that opens the customer's address in Google Maps.
- Phone numbers as tap-to-call links — handy for drivers using the ticket on a phone or tablet.
To remove the customer, click the small × next to their name and confirm — "Are you sure you want to remove this customer from this ticket?"
Deliver to a different address (Alternate Address)
When the goods should go somewhere other than the customer's address on file — a job site, a relative's house, a gift recipient:
- On the delivery ticket, click + Alternate Address. (Stores set up for florist-style deliveries see this labeled Recipient Information instead.)
- Type the full delivery address in the box.
- Click Save. The page reloads; the customer block now shows a highlighted See alternate address note so nobody delivers to the address on file by mistake.
Once an alternate address is set, the ticket's driving directions and map switch to it (the Directions to Alternate Address section replaces the directions to the customer's own address).
Schedule the delivery: Status, Date, and Time
The scheduling controls sit at the top right of the delivery ticket:
- Status — the dropdown moves the ticket through its life: On Hold, Scheduled, Ready, Loading, Loaded, Out for Delivery, Delivered, Canceled. Full details on each status are in Delivery Scheduling & Blackout Dates.
- Date — click the field and pick a date from the calendar. Days are shaded by how many deliveries are already scheduled (hover a day for a count like "3 scheduled"), and blacked-out dates are unavailable. Picking a date automatically moves the status to Scheduled.
- The Time dropdown next to the date — AM, PM, or Anytime by default; some stores have custom time slots configured by VMX.
Two rules to know:
- "Delivery date must be set before marking as Scheduled." — you can't set the status to Scheduled while the ticket has no date. Pick a date first (the status then updates on its own).
- "Cannot clear delivery date while delivery is Scheduled." — to take a Scheduled delivery off the calendar, change its status (for example to On Hold or Canceled) instead of blanking the date.
Some stores also have per-day delivery limits or extra scheduling requirements (such as choosing a driver or time before a date can be set) configured per-client by VMX — if scheduling is blocked with a message about too many deliveries or a missing driver/time, that's your store's configured rule. Contact help@vmxllc.com to adjust these rules.
Assign a driver and truck to a delivery
At the top of the delivery ticket:
- Driver — pick the employee driving this delivery. While it reads Unassigned, the dropdown is highlighted yellow as a reminder.
- Truck — pick the vehicle. Also highlighted yellow while Unassigned. The truck list is managed on the Deliveries Vehicles tab — see Manage delivery vehicles.
Stores with delivery routing enabled also get a Route dropdown here to place the ticket on an existing route — see Delivery Routes & Driver Printouts for creating and working routes, including assigning a single delivery to a route from its ticket. Routing is enabled per-client by VMX; contact help@vmxllc.com if you'd like it.
Items on the delivery ticket (Receipt Items)
The Receipt Items table lists every item from every receipt attached to the ticket, sorted by description:
- PLU — the item number.
- Description — the item's name (linked to the item's inventory page) plus any size/description from the receipt line.
- Qty Sold — the quantity from the receipt.
- Retail $ — the unit price. (Some stores' tickets are configured without the price column.)
- Note — any note entered on that line at the register (for example "does not need delivery" or a product location). Line notes from the sale carry through to the ticket automatically.
If an attached receipt was voided (or is itself a voiding receipt), its lines are flagged with a VOIDED / VOIDS label so the crew doesn't pull items that were unsold.
Items from attached purchase orders appear in their own PO Items table (PLU, Description, Quantity, Note), and items from attached held sales in a Held Sale Items table (PLU, Description, Quantity).
Item notes from a held sale on the delivery ticket
For some stores (enabled per-client by VMX), the note typed on an item when the sale was held at the register shows on the delivery or pickup ticket, in italics under that item's description in the Held Sale Items table. Nothing extra needs to be done: add the item note at the register, hold the sale, and the note appears on the ticket. Contact help@vmxllc.com if you'd like held-sale item notes shown on your tickets.
Attach receipts, held sales, and POs to a delivery ticket
A delivery ticket can carry items from receipts (completed sales), held sales (saved-but-unpaid sales), and purchase orders (for example, a special order being delivered straight to the customer). The three buttons are at the bottom right of the items area:
- + Add Receipt — at the prompt "Scan receipt barcode or enter receipt #:", scan the barcode on a printed receipt or type the receipt number. The receipt number appears at the top left of the Register screen when the sale is loaded.
- + Add Held Sale — at the prompt "Scan held sale barcode or enter held sale #:", scan the held sale slip's barcode or type its number.
- + Add PO — at the prompt "Enter PO # to add to this ticket:", type the purchase order number.
The page reloads with the document attached and its items added to the ticket. If the number doesn't exist you'll see "The receipt number does not appear to be valid." (or the held sale / PO equivalent); input that isn't a valid barcode or number shows "Invalid receipt barcode or number."; attaching the same held sale twice shows "This held sale is already on this delivery ticket."
Open the receipt or PO from a delivery ticket
Each attached document is listed on the ticket as a heading — for example Receipt # 12345 with its sale date and amount paid, or PO # 678. These are hyperlinks:
- Click the Receipt # link to open that receipt on the Register screen — useful for checking payment, reprinting, or making changes to the sale.
- Click the PO # link to open the purchase order.
Receipt headings also show a VOIDED or VOIDS label when the sale was voided, plus any receipt note.
Remove a receipt, held sale, or PO from a delivery ticket
Next to each attached document's heading is a small × icon. Click it and confirm the prompt:
- "Remove receipt # 12345 from this delivery ticket?"
- "Remove Held Sale # 678 from this delivery ticket?"
- "Remove PO # 91011 from this delivery ticket?"
Removing a document takes its items off the ticket; it does not change the receipt, held sale, or PO itself.
Special Instructions for the driver
The Special Instructions box on the delivery ticket is free text for anything the driver needs to know — a gate code, "leave by the garage," a requested time window from the customer. It saves automatically as you type (a pencil icon appears briefly while unsaved edits are pending), and whatever is entered prints on the delivery ticket.
Driving directions and map on the delivery ticket
VMX automatically looks up driving directions from your store to the delivery address:
- The Directions to [customer] section (or Directions to Alternate Address, when one is set) shows the distance, estimated drive time, and turn-by-turn directions.
- Next to the directions, click the Click to Load box to display the destination on an interactive map.
- The printed ticket includes a QR code labeled Directions — the driver scans it with a phone to open the delivery address in their maps app.
If the address can't be found you'll see "Failed getting directions." — check the customer's address (or the alternate address) for typos or missing city/state/zip.
Proof of Delivery: time, name, and signature
The Proof of Delivery section records who accepted the delivery and when:
- Time — when the delivery was made.
- Accepted By — the name of the person who received it.
- Capture Signature — opens a full-screen Capture Customer Signature pad. Have the customer sign with a finger or mouse, then click Accept Signature (or Clear to start over). The signature is saved to the ticket as an attachment. Clicking Accept with an empty pad shows "Please draw a signature first."
- Attachments — click + Attachment to add a photo of the delivered items at the door, a signed paper slip, or any other file. Image attachments display right on the ticket.
Both the Time and Accepted By fields save automatically as you type.
When a ticket's status is set to Delivered, VMX also freezes the address it was delivered to. The ticket afterward shows a banner — Delivered to: the address on the date — so later address changes on the customer's profile can't obscure where the delivery actually went.
Ticket Updates: the change history
The Ticket Updates section at the bottom of the delivery ticket is an audit trail of every change: who created the ticket, and who set each field (status, date, driver, and so on) to what value, on which date. Hover over a value to see what it was before the change. Use it to answer "who rescheduled this?" or "when did this go out for delivery?" — it appears on screen only and is not printed.
Print a delivery ticket
Print the ticket page from your browser (File → Print, or Ctrl/Cmd-P). The printout is formatted as a delivery slip: buttons, dropdowns, and the change history are left off, and the driver gets the customer and address, the items, special instructions, directions, and the scannable Directions QR code.
To print every ticket for a delivery day in one job, use Print Day on the Deliveries page — see Print all delivery tickets for a day.
Florist-style stores can also have enclosure card printing on the ticket (a Print Enclosure Cards button that prints the gift card message for the arrangement). This is set up and customized per-client by VMX — contact help@vmxllc.com if you'd like it.
Pickup tickets use the same page
Stores that track customer pickups (enabled per-client by VMX) use this same ticket page for them: the title reads Pickup Ticket #, the date field is labeled Pickup Date, and the final status is Picked Up instead of Delivered. Everything else — customer, items, notes, attachments, proof of pickup — works the same way. See Customer pickups.