Item
Welcome to the Item page! Find everything you need to know and more about each item in your inventory.
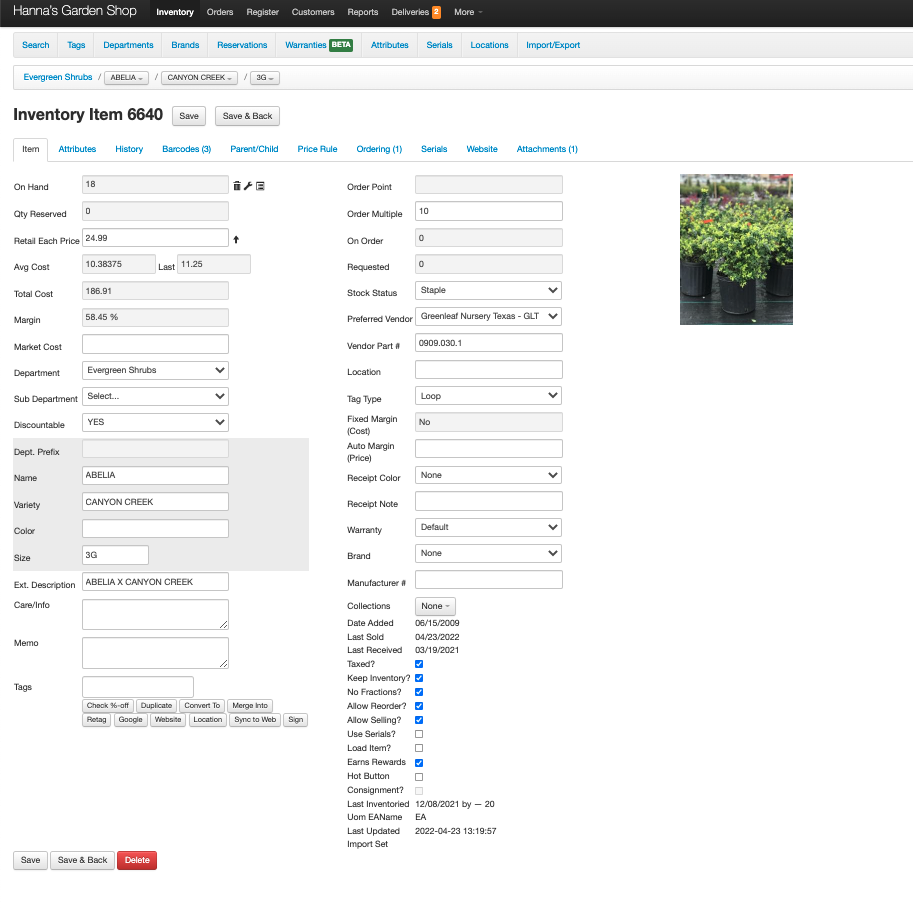
There are several tabs which sort the item's information within the item page: Item, Attributes, History, Barcodes, Parent/Child, Price Rule, Ordering, Website, and Attachments. (Some stores see additional tabs, such as Lots or Serials, depending on the features they use.) No matter which tab you are on, at the top of the page you can see the department, followed by the item’s name, variety, and size. Below that you will see the item's number/PLU next to Save and Save & Back buttons, plus the ⚡ Actions dropdown menu on the right.
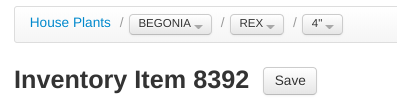
The department is a link that will take you back to the search page showing only inventory items in that department.
If there are other types of plants (names) in the department, the name of the item whose page you are on will be a drop-down that shows the names of all other items in the department.\ \ If there are other varieties of that type of plant (name), the variety will be a drop-down that shows other varieties in inventory.\ If there are other sizes of that variety, the size will be a drop-down that shows other sizes in inventory and the quantity in stock.
On Hand
The "On Hand" field deals with the quantity of an item you have in stock. This field will always reflect the number of items that are in stock for that particular PLU.
To make edits to the On Hand quantity you can select the field and the On Hand Adjustment window will appear. It has a section for each kind of adjustment — Misc (set the quantity to a new count), Trash (items broken, dead, or thrown away), and Store Use (items used at your store) — and each section takes a quantity and an optional note.
Info
You can also jump straight to a “Trash” (trash can icon) or “Store Use” (wrench icon) adjustment by selecting the icons to the right of the On Hand field. 
Qty Reserved
You can reserve items due to quality (for example, if a plant has been cutback) or for a customer. When there is a reserved quantity for the item, the Qty Reserved field will be blue.
To reserve an item or items, select the Qty Reserved field. A Qty Reserved window opens showing all reservations for the item. Click + New Reservation and enter the quantity to be reserved, the reason for the reservation (Customer, Quality, Growing, or Transfer), an optional note, an optional expiration date, and if applicable, the customer.
The customer field will search all existing customer accounts as you type, so the customer you are making the reservation for must have an account with your store. \ Then save the new reservation and the items will show as on reserve in the system.
If you need to release a reservation, select the Qty Reserved field to see the table of existing reservations for that item. On the right side of the table, click Release — you'll be asked how many to release, so you can release part or all of the reservation.
When an item has a reserved quantity, register search results show the available quantity plus the reserved quantity (for example, 12+8 means 12 available with 8 more reserved) along with an asterisk (*) to flag that the item has reservations.
Retail Each Price
You can change the selling price of an item by clicking in the Retail Each Price field (the item's unit price), editing the price, and saving your changes with the Save button at the top of the page. The up-arrow icon  next to the price field bumps the price up to the next common price point ($4.99, $9.99, $14.99, $19.99, …).
Avg Cost/Total Cost
The average cost of all items is calculated by the system based on all the times an item has been received on a PO. The average of all the costs is recorded in the Avg Cost field, with the most recent receiving cost shown next to it in the Last field. \ If you need to manually change the average cost of an item, click inside the field — if the item has stock on hand, you'll be asked to confirm (twice) that you really want to change the cost of items already in stock — and then enter the new average cost and an optional note.
The Total Cost is the product of the quantity on hand and the average cost. Items with 0 on hand will have a total cost of 0. This field is not editable.
Margin
The profit margin for an item is based on the average cost and the retail each price. If you want to change the margin, select the Margin field and enter your desired margin. The price will then change to produce the margin you entered (rounded to a price ending in 9 cents, so the resulting margin may differ slightly).
Department
View or change the item’s department from the Department field. The item's department will impact various reports. You can also assign the item to a Sub Department and to Collections in the same section — see the Departments page for how those are set up:
Departments, Sub Departments & Brands
Discountable
Determine if an item is subject to discounts using the Discountable buttons: Yes, Sometimes, or Never. The discountable designation affects the process of manually applying a discount to an item:
| Yes | Sometimes | Never |
|---|---|---|
| Apply discounts freely | Prompted to confirm discounts | Discounts not applied at all |
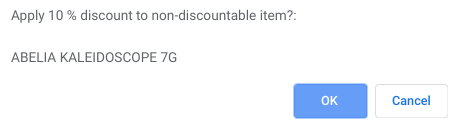
Items marked Never also can't have a coupon applied at the register — the register shows "COUPON NOT ALLOWED ON NON-DISCOUNTABLE ITEM".
Description
All changes to the description fields need to be saved using the  button at the top of the item page.
Prefix
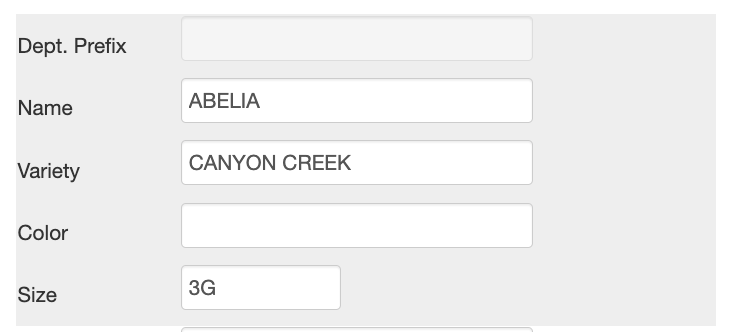
The department prefix is displayed in the read-only Dept. Prefix field (and, if the item is in a sub department, a Sub Dept. Prefix field). \ To edit a prefix, see the Departments page:
Departments, Sub Departments & Brands
Name/Variety/Color/Size
View and change the item’s description in these 4 fields.
Name is often used to represent a generic type of plant, such as “Oak” or “Rhododendron”.
Variety is often used to represent a specific variety of plant, such as “Live” (as in Live Oak) or “English Roseum” (as in English Roseum Rhododendron).
Color of the item.
Size is often used to show pot sizes, such as 3G, QT (for quart), or 6/7’ BB (six to seven foot tall, balled & burlapped).
Ext. Description
View and change the extended description here. This field is often used to show a plant’s botanical name, various common names, or other short notes.

Care/Info
Any information entered into this field will print onto this item’s tags.

Memo
Add any additional notes about the item into this field.
Info
A memo will automatically be added to any duplicated items
Actions Menu
Item actions live in the ⚡ Actions dropdown at the top right of the item page. It contains Duplicate, Convert To, Merge Into, Retag, See %-off Table, Sales Report (12 mo), Google, Sync to Web, and Print Sign. (A couple of actions only show when they apply: Convert To requires the item to keep inventory, and Merge Into is only available for regular items.)
See %-off Table
Click ⚡ Actions → See %-off Table to open a discount table with potential percentage discount information for the item.
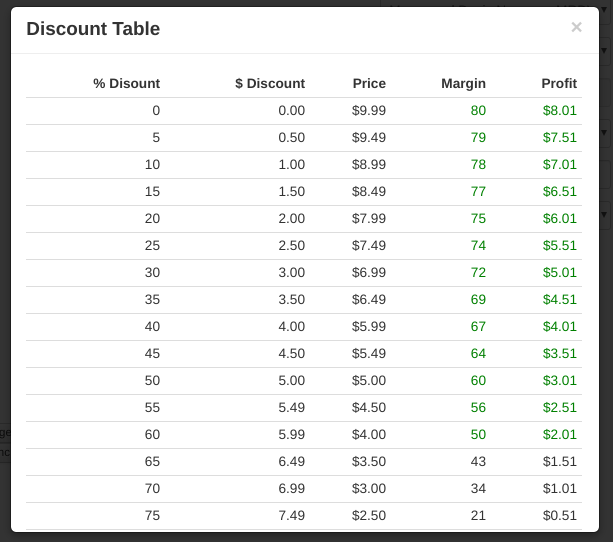
| % Discount | $ Discount | Price | Margin | Profit |
|---|---|---|---|---|
| Percentage to be discounted | Dollar amount of discount | Realized price after discount | Margin adjusted after discount | Amount of profit to be earned at discount amount |
Duplicate
Click ⚡ Actions → Duplicate to duplicate the item. You will be asked to confirm the duplication and then a new item will be created with most of the same information as the original item, but a new PLU.
The duplicate item will always start with a quantity of 0 and a memo that indicates that it is a duplicate of the original item.
Info
Duplicate items are often used when you need to receive an existing item in a new size. \ For example, you may have an item called “HELLERI HOLLY 3G” in inventory but need to add “HELLERI HOLLY 7G”. \ Duplicating the 3G would be significantly easier than making a blank new item and filling the fields in for the 7G.
Convert To
This function allows you to move items from one PLU to another easily. To convert, select ⚡ Actions → Convert To and fill out the modal.
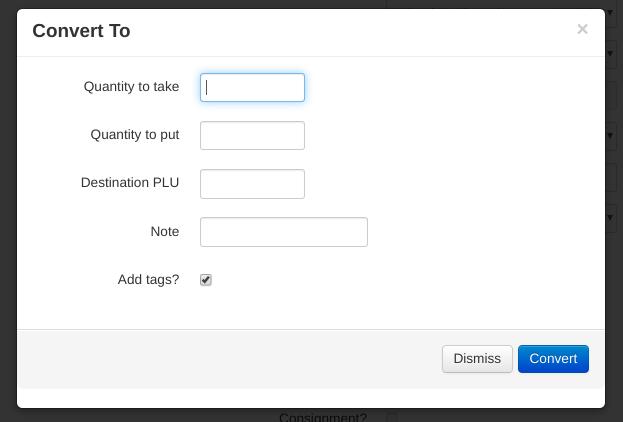
The quantity you want to remove from the PLU. You can also enter negative quantities into this field if some items were mistakenly sold using the wrong PLU.
The quantity you want to add to the new PLU. Usually this is the same as the quantity to take but if you are splitting or combining a plant, you may have a different ratio of "take" to "put".
The destination PLU is the item you want to add more of. The destination PLU field will automatically show a drop down of all other sizes of the item you are converting but also functions as a search of all inventory items.
The modal also has optional Reserve?, Until, and Reserve Customer fields (to reserve the converted quantity), a Note, and an Add tags? checkbox to queue tags for the converted items. Click Convert to finish.
What happens to cost when you convert
Cost moves with the quantity, scaled by the take/put ratio. The destination units are received at the source item's average cost x (quantity to take / quantity to put):
- One for one (a 2" tree that has grown into a 2.5"): the destination unit carries the source's full average cost. You paid $100 for it two years ago, and the 2.5" now shows a $100 cost — so the extra margin you earned by growing it shows up as margin, not as a bigger cost.
- Splitting (take 1 perennial clump, put 3 divisions): the $12 clump becomes three units at $4 each. Total inventory cost is unchanged.
- Combining (take 3, put 1): the three $4 units become one at $12.
Both sides are recorded as inventory adjustments linked to each other, so the total value of your inventory does not move — only which PLU is holding it.
The vendor does not come across
Convert To does not change the vendor on the destination item. If you need the grown-on size to show where the original plant came from, set its vendor by hand on the destination item.
Merge Into
Make two PLU’s into one with ⚡ Actions → Merge Into. Be sure that the PLU whose item page you are on is the one you want to be deleted — its barcodes, sales, receiving, and adjustment history are all reassigned to the destination PLU, and its own properties (name, price, department, memo) are lost. \ The PLU that you are merging into should be entered into the Destination PLU field.
Warning
Merging is permanent and cannot be undone. To confirm, you must type MERGE when prompted.
Retag
⚡ Actions → Retag can be used to queue tags for an item. The system will pre-populate the tag quantity with the on hand quantity, but you can also enter a custom number of tags to be queued. Queued tags print from the Tags page:
⚡ Actions → Google will do a Google search of the item's description in a new browser window.
Sync to Web
Manually update item information to your website with ⚡ Actions → Sync to Web. The system pushes item changes to the website automatically — usually within moments, and rarely more than a few minutes — but you can update the website immediately using the Sync to Web action. See the Website Sync page for what syncs and when:
Website Sync (POS to Online Store)
Signs
Create a printable sign including descriptions, unit price, attributes, and a picture!
Click ⚡ Actions → Print Sign to open the sign for this item — from there you can add it to the sign queue and print several items' signs in batches. See the full guide:
Interested in customizing your sign layout in VMX? Give us a call!
.png)
Order Point
Enter order points to help stay on top of your purchasing. In the Order Point window, each rule has a Start Day, an Order Point (the minimum — when on hand reaches this level, the item shows up for reordering), and an optional Max (the target quantity to reorder back up to; the system suggests ordering Max − On Hand − On Order). Leave Start Day blank for a year-round rule, or create multiple rules with different start days to reflect seasonal changes.
Example: Set Order Point = 10 and Max = 50. When you have 8 units on hand, the system will suggest ordering 42 units.
When items sell down to their order point, they will appear on the Order Recommendations report:
Order Multiple/On Order
If items are only ordered in sets, boxes, or packs, indicate the number of items ordered at a time in the Order Multiple field.
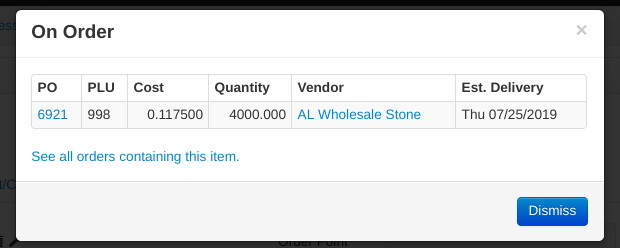
The On Order field shows the quantity of the item that is currently on any purchase order with an ETA. You can also click inside this field to view the purchase order information and other orders with the same item on them.
Requested
See the quantity of the item that has been requested by customers at your store. Click inside the Requested field to view a table of all requests for the item with links to the customer account and the full Wish List.
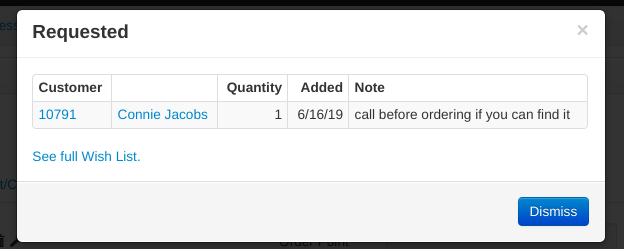
You can’t add requests from item pages, only view them, but see how to add requests on the Wish List page.
Stock Status/Primary Vendor
Use the Stock Status field to designate items as Staple, Discontinued, or Upon Request (or leave it at Default).
Staple marks an item you commit to carrying — the assortment you want on the shelf year round. The ordering reports read it: Order Planning treats Staple and Default items alike when working out what to reorder, and both the Item Sales report and the Buyer's Report offer an "only staple" filter so you can review just that committed assortment. Because those reports depend on it, keep the field honest — an item that no longer earns its place should come off Staple rather than linger.
Discontinued hides the item from register search and hot buttons, and removes it from the online store.
Select the item's Primary Vendor from the complete list in this field. Type inside the field to quickly find the right vendor. The Vendor Part # field next to it stores that vendor's part number for the item.
Staple items on your website
Items whose Stock Status is set to Staple can show a Customer favorite badge on the department and category listing pages of your web store, so shoppers can see at a glance which plants you always keep on hand. Setting Stock Status to Staple on the item is all that is required — there is no separate web setting to turn on per item.
The badge is deliberately left off any listing page where most of the items are staples. A badge that appears on nearly every product on a page tells a shopper nothing they did not already know from the page they clicked, so if you mark most of a department as Staple, expect the badge not to appear in that department. Marking fewer, more deliberate staples is what makes it show.
This feature is enabled per-client by VMX — contact help@vmxllc.com if you would like it enabled for your store.
Tag Type
Set the tag type by selecting from the drop down list in this field. Once set, this will be the default type whenever tags are queued for this item. When no tag type is chosen on the item, a hint next to the field shows which tag type the item is inheriting from its sub department, department, or the company default. \ Learn about tag types on the Tag Types & Designer page:
Fixed Cost % (Fixed Margin)
The Fixed Cost % field sets a fixed margin used to determine the item's cost at the time of sale, based on the sale price. Fixed margin is only allowed for consignment items. Because this cost is not based on the actual cost of the item in inventory, it would bring the inventory out of balance — but as consignment items are not included in Inventory or COGS, they are allowed.
The related Auto Price % field works in the other direction: it sets the item's price automatically from its cost at a fixed margin.
Receipt Color/Receipt Note
Change the color of the font for this item on receipts by selecting a color (None, Blue, Green, Red, or Purple) in the Receipt Color field and saving.

\ Also add a note to the receipt using the Receipt Note field. The note will be shown in the system and on the customer’s receipt.
Load Item / Load Ticket
Check this box for items that physically need to be loaded for the customer — bulk mulch, soil, large pallets, heavy hardgoods. When the item sells at the register, VMX prints a separate load ticket alongside the customer receipt. The cashier hands the load ticket to the yard crew so customers can get loaded up without going back to the register.
To enable: open the item page and check the "Load Item?" checkbox in the Receipt section.
The load ticket includes the item, quantity, and customer info. Refunds appear as negative quantities so the yard team knows when to put items back.
Tip
Selling a mix of load items and regular items in the same transaction? The load ticket lists only the load items; regular items still print on the customer receipt normally.
Weighed Item
Turn on Weighed Item? for anything sold by the pound — produce, bulk seed, candy, coffee, soil. When a weighed item is rung up on a register that has a scale attached, VMX reads the scale and uses the weight as the quantity, so the cashier just puts the item on the scale and rings it up.
To enable: open the item page and turn on the Weighed Item? switch on the Item tab.
The Weighed Item? switch only appears once at least one scale has been set up on Admin → Registers → Scales, because the flag has no effect without one. Set the scale up first and the switch will be there.
A few things to get right on a weighed item:
- Price it per pound. The weight becomes the quantity, so the unit price must be the price of one pound.
- Leave "No Fractions?" off, or a weight like 2.4 lb cannot ring correctly.
- A typed quantity overrides the scale. If the cashier keys a quantity before ringing the item, VMX uses that number instead of reading the scale — this is the manual override for when a scale is down.
- Units of measure are ignored for weighed items. If the item has a default selling unit such as a case or a bag, VMX does not multiply the scale reading by that unit's size, because the weight is already the amount being sold.
You can set this in bulk through Inventory → Import/Export using the Weighed Item? column in the Flags group (1 for yes, 0 for no).
For scale setup, selling by weight at the register, and troubleshooting, see Scales & Selling by Weight.
Brand
Designate a brand for the item in the Brand field, such as Proven Winner or Southern Living, and record the manufacturer's item number in the Manufacturer # field. Brands can be added to the system under Inventory, Brands:
Departments, Sub Departments & Brands
Other Item Info
Date Added/Last Sold/Last Received
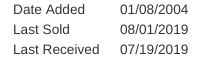
The date added is the original date the PLU was added to the system. \ The last sold date is the last time the PLU was on a completed sale. \ The last received date is the last time a PLU was on a completed PO.
Taxed
Should customers pay tax on this item? Some items may be tax free in your state (like seeds in the state of Alabama)
Keep Inventory
Does this item need to be kept in inventory? Items like labor charges or delivery fees do not need to be in inventory. Uncheck the Keep Inventory? checkbox (at the top of the Inventory section) for items whose on hand count should not be maintained when they are sold.
No Fractions
Some plants need to have the ability to be rung up at fractional quantities. For example, cut pieces of coco liner may be rung up as two and a half feet of length. To ring this up, enter 2.5 as the quantity. The system will not allow fractional quantities if the No Fractions? box is checked.
Allow Reorder/Allow Selling
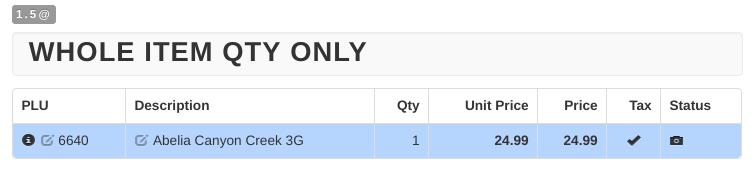
By unchecking the Allow Reorder? box (in the Ordering section header), the system will not allow the item to be added to a pending purchase order. Unchecking the Allow Selling? box (in the Selling section header) will prevent the item from being rung up on a sale.
If you uncheck both allow reorder and allow selling, the item will become an “archived” item. Archived items will not show on the inventory search or on the register page search (an item with stock remaining still shows until its on-hand quantity reaches zero). To view archived items, go to the inventory search page and select the Include Archived checkbox from the Filter drop down. Archived items are shown with a line through them.

Hot Button
Select the Hot Button checkbox to add a "Hot Button" for this item to the Register screen. To learn more, see the Hot Buttons page:
Require Qty
Check Require Qty? for items where the cashier should always be asked to enter the quantity when the item is rung up — useful for by-the-foot or bulk items that are never sold as exactly one.
Require Customer
Turn this on for items that should never be sold anonymously — soil tests, special orders, warranty registrations, anything where you need a customer record attached to the sale.
When checked:
- A warning appears on the register the moment the item is rung up without a customer attached.
- A person icon shows next to the item on the sale — red when no customer is set, green once a customer has been attached.
- The sale cannot be tendered until a customer is attached. Attempting to tender shows "CUSTOMER REQUIRED FOR ITEM" and the sale stays open.
The default is No (off). Turn it on per-item from the item page, or set it in bulk by exporting inventory, editing the "Require Customer?" column in the spreadsheet, and re-importing.
Earns Rewards
If your store uses a rewards program, the Earns Rewards checkbox controls whether customers buying this item earn rewards on the purchase.
Consignment
The Consignment? checkbox shows whether or not an item is a consignment item. Consignment status is not changeable and is only set during the creation of a new item.
Last Inventoried/Last Updated
Last inventoried shows the date, employee, and quantity for the last time the item was counted on the Inventory Worksheet. Last updated shows the date for the last time the item experienced any saved change.
Item Photo
The item's photo that can be added through attachments will show on the right side of the item page.